Thursday 22 December 2011
Cute present
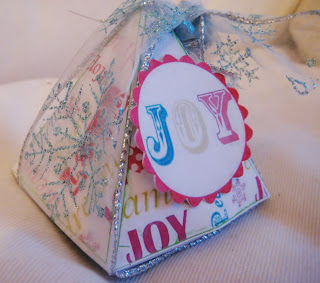
I have been so busy with Christmas shopping and preparations that I haven't had much time to craft. However I did manage this little box for a friend's present. If you fancy having a go yourself here is the template.
Thursday 15 December 2011
Sapin de Noël
Here is my tree in participation in the challenge offered by Evlin on her blog Les passions d'Evlin.
It looks better in real life and with the lights on but I'm not good at taking night pictures... so this will have to do. I still think it looks a bit plain and needs something to give it the wow factor but I can't put my finger on it. May be you can help me solve my dilemna!
It looks better in real life and with the lights on but I'm not good at taking night pictures... so this will have to do. I still think it looks a bit plain and needs something to give it the wow factor but I can't put my finger on it. May be you can help me solve my dilemna!
Tuesday 13 December 2011
Free templates
This lady is very talented. Have a look at her blog she provides lots of free card templates. Worth a look when you stuck for ideas. Her blog here
Zip flower
I have seen these zip flowers all over the place recently and quite fancied to have a go myself. So when I saw this was part of our Christmas advent challenge at l'atelier à scrap I was really excited (yeah, I know it doesn't take much!). I use a long plastic zip as the metal ones can be a bit scratchy and here is the result:
The tighter the stich the more wavy your flower will be. I stiched the button in the middle for a bit of bling!
Christmas lantern
Here is a lantern I did as part of a Christmas crop for l'atelier à scrap.
It's actually quite easy to make and looks cool when the candle's lit up.
It's actually quite easy to make and looks cool when the candle's lit up.
You can view the tutorial here
Sunday 11 December 2011
Blog Candy
Great news from ScrapFriends. They've started a blog where they'll publish latest news, stock arrivals and all other information related to scrapbooking.
They are also going to run challenges and competitions.
To celebrate their opening they have a sweet candy for grab.
Not one, not two ... but three candies.
Visit their site, become a friend and get a chance to win all these fab goodies!
Saturday 10 December 2011
Christmas card
I forgot I bought these Christmas papers last year and during my hunting for embellishments I came across these and decided to put them to good use. I hope you like it.
I cut the trees free hand and embossed them with a Christmas sizzix
folder. I distressed them with Rangers "peeled paint" distress ink and
covered them in glitter glue.
I cut out some smowflakes with Marianne Creatables dies and glittered one of them whilst putting Mod Podge on the other.
I then glued lots of small flower metal findings to imitate small snowflakes. That's it!
 |
 | ||
| The deer and writing was a free stamp |
 | |||||||
|
Friday 9 December 2011
My Christmas wreath
In my previous post I was admiring some very beautiful homemade wreaths and I finally decided to have a go and made this one:
My sister found the tutorial here:http://hobbydoos-anneke.blogspot.com/2011/11/turtorial-krans-met-pedaalemmerzakken.html if you feel inspired. It's in Dutch but every step is in picture too so it's easy to understand.
I used white pedal bin liners. You have to cut the sealed end off and then just tie the bag around the ring. Secure it with a tight knot and keep going until the whole ring is covered. Once all the bags are in place, start opening them one by one and "fluffing" them up as you do. And you're done. Then just add the decorations you fancy to make it more colourful or just keep it plain for a simple clean look.
It took about two hours just to wrap all the plastic bags on the polysterene ring (didn't have a twig one!). Well worth having a go!
Tuesday 6 December 2011
Wreath inspiration
I have been looking for a bit of inspiration for a modern wreath. I saw several on the net whilst blog hopping but I never seem to remember where from (after a few hours of hopping!!). So when I found this link I thought I would share it now before I forgot - again! It's got lots of fabulous ideas all I have to do now is get crafting!!

http://freshome.com/2009/12/13/34-great-christmas-wreath-decorating-ideas/
http://freshome.com/2009/12/13/34-great-christmas-wreath-decorating-ideas/
Sunday 27 November 2011
A bit of va va voom...
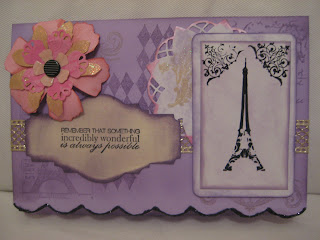
Yes another birthday , (they never stop!) but this time was told it had to do with Paris so here my take on the subject...
Thursday 24 November 2011
New background
I decided my previous background was a little sober and I felt it needed cheering up so I hope you like it. It's from Aqua Poppy Designs, she does some lovely stuff. I had to make my own matching banner because she doesn't provide the banners but I am not complaining...
Do you converse....
Well it's been well over a week since my last post and I thought it was time to make an effort and show signs of life! My son was ill those last couple of days and decided to spray the walls with whatever was coming out of his mouth!! How much can a small child regurgitate??!!! It's unbelievable... and since I have a very sensitive nose and a rather weak stomach, let me tell you I did NOT have much fun... The 3 o'clock calls (why is it that when they're ill children always seem to shout "mummy" in the middle of the night?! daddy is much shorter and rolls perfectly well off the tongue, so why, why oh why?!!!!). Anyway having had to stay home to look after him I thought I would put my free time to good use and produced this:
This is a card for my daughter's friend who is thirteen this weekend. I was under strict instructions: it had to be purple, no flowers or things too girly as she is a bit of a tomboy and no little girl stamps as she is far too old for that now!! Anyway whilst I was trying to get to sleep after the second "mummy" call last night it came to me! They all love Converse shoes and since the shape is kind of easy to reproduce I decided to give it a go.
 |
| Stamp is Red Gingham Designs "Super six- Sentiments" from www.littleclaire.co.uk |
 |
| Ribbon from Trudy Anne Designs |
I made a very rough template you can download here: Converse template
I printed it first on paper and cut it out. I then traced the bottom part of the ouline on card (cutting one shoe first) and then scored and folded the card in half and cut the second shoe from the shape of the first cut (a bit confused?? it is really easy when you do it ! promise!). Once you have your based shape just punch some holes for the rivets and decorate with stamps etc... When you're all done with the customisation of your trainer, fix in the rivets and thread the ribbon or laces. For the bottom part I used a ribbon from Trudy Anne Designs which I purchased at the Hobbycraft show a few weeks back. I chose it because the stiching made it look a little like the lines on the bottom of the real Converse. Anyway I think I stuck to the brief... Why don't you give it a go and show me yours....
Tuesday 15 November 2011
Blog Candy from the Craft Barn
Why not enter the blog candy competition, you have nothing to loose but plenty of goodies to win!
It's like Christmas come early, so go on have a go! Good luck!
Sunday 13 November 2011
November card sketch from Les ateliers du scrap
 |
| Here is my card for November following the sketch from Scrapala on "les ateliers du scrap". |
 I dotted glue on all the spots from the red background and glittered them with very fine white iridescent glitter.
 The little girls' hat and gloves have white flock added to give a woolly effect. The scarf was coloured first with promarkers. I then applied Modpodge and whilst it was still wet I sprinkled some Perfect Pearls in Forever red. The snow is also glue covered in white iridescent glitter.

The tag was cut with a die from the Tim Holz Alteration range. This one is called "Tag & bookplate". I embossed it with a sizzix embossing folder "dearly and frost set" and then carefully rubbed some "walnut" distressed ink on the embossed parts of the tag. To finish it I sprayed the tag with some "mandarin" Perfect Peals mist. The second part of the tag was stamped with happy birthday and glued in place.
Saturday 12 November 2011
Molly's birthday
It's my little girl's birthday tomorrow and I just had to create a lovely card to mark the event. She loves the gorjuss range and actually since she has long hair herself this little doll reminds me a bit of her. The background stamp is by Kaban (one of my hobbycraft show acquisitions... amongst many others... ouch my flexible friend is going to cry again...!). The border is Marianne Creatables and the frame stamp is from Papermania. The gorjuss image itself is not a stamp but a "tube" downloaded from here. Basically it's the same as a digistamp as it is produce as a png file which means the background is transparent. If you're a Gorjuss fan it's worth the visit.
This one is for my niece as when I was in the mood I had to carry on...
Friday 11 November 2011
Poppy appeal
 It's rememberance day and I couldn't let this pass without showing you my poppy. Every year I buy a multitude of poppies which within half an hour have dropped somewhere along the way. So this year I made one out of polymer clay which is glued on a brooch pin. This way no more disappearing act!
 Thursday 10 November 2011
Boy's card
 I am really bad at male cards. I like glitter and pink and everything cute ... not really every boy's dream idea of a cool card. He is at this awkward teen-age when Power Rangers are definetely out, so are Batman and Spiderman - aaah these were the days.... So I found myself short of time and short of ideas for this one. It turned out much more grown up than I anticipated but still I managed to keep the glitter under control so I guess he should be grateful for that at least! My other half "supportive" comment was "it's a bit drab for a young boy"... thanks love I just needed that boost to my confidence in my moment of doubt! Never mind you can be the judge...
 The large label is cut with Tim Holtz movers and shapers "styled labels" from the Alterations range and stamped with my latest fiskars stamps "Henna petals" (it's beautiful and one of my favourites at the moment). The papers " Desert Blooms" are from First Edition Papers - if you like shabby chic you'll love these! In fact I am very reluctant to use them because they are too beautiful to cut out.... Don't laugh I bet you do that too! The tags are Sizzix sislits "tag set - small". All edges were inked to give it the aged look so popular at the moment with a combination of distressed ink from the rangers collection.
Here is my fiskars favourite of the moment and when I have time I might even add images of embossed flowers produced with the flower supplied. The photo really doesn't do it any justice....
Tuesday 8 November 2011
Monday 7 November 2011
Woolly jumper transformation
A while ago a friend of mine gave me a really long and rather shabby looking wool cardigan. After I tried it on and decided it definetely didn't improve my looks (let's face it it's going to take more than a wolly cardi to do that!) I still couldn't bring myself to just give it away. I kinda felt sorry for it ; after all it had already been rejected once, I couldn't possibly abandon it as well ( ok maybe it had no feelings but it sure looked a sad case!). Anyway I'd alway wanted to have a go at felting and I'd read somewhere you could reproduce the felt effect by boiling wool. This was going to be the only opportunity I'd get to shrink wool for free since I NEVER buy pure wool jumpers. Firstly because they make me itch but also because they need hand washing and I don't do hand washing. Anything that requires hand wash ends up living at the bottom of the washing basket for a fair few months before I can bring myself to deal with it. Anyway here is the transformation from cardigan to ...shoulder bag!
 |
| Ideal to display my cancer research badges (another three to be added!) |
 |
| Handmade flowers apart from orange one |
 |
| Mobile phone pocket under the flap |
More polymer clay...
Just a quick one this time. This is a present for a friend. I actually made him a while ago but only just got around to varnishing him. I wasn't entirely happy with him as I thought I made his head kinda funny but now that he's varnished he is growing on me. Not for long though as he's off to his new home by the end of the week!
Thursday 3 November 2011
More small treats
 |
| Waffle with strawberries and chocolate sauce |
 |
| Cinnamon apple pie |
 |
| Cherry pie |
 |
| French "macarons" |
 |
| Plain waffles crying out for whipped creme! |
 |
| Butter biscuit |
Subscribe to:
Posts (Atom)


