Thursday, 22 December 2011
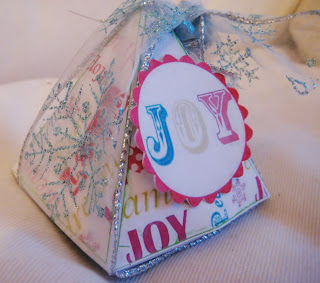
Cute present
I have been so busy with Christmas shopping and preparations that I haven't had much time to craft. However I did manage this little box for a friend's present. If you fancy having a go yourself here is the template.
Thursday, 15 December 2011
Sapin de Noël
Here is my tree in participation in the challenge offered by Evlin on her blog Les passions d'Evlin.
It looks better in real life and with the lights on but I'm not good at taking night pictures... so this will have to do. I still think it looks a bit plain and needs something to give it the wow factor but I can't put my finger on it. May be you can help me solve my dilemna!
It looks better in real life and with the lights on but I'm not good at taking night pictures... so this will have to do. I still think it looks a bit plain and needs something to give it the wow factor but I can't put my finger on it. May be you can help me solve my dilemna!
Tuesday, 13 December 2011
Free templates
This lady is very talented. Have a look at her blog she provides lots of free card templates. Worth a look when you stuck for ideas. Her blog here
Zip flower
I have seen these zip flowers all over the place recently and quite fancied to have a go myself. So when I saw this was part of our Christmas advent challenge at l'atelier à scrap I was really excited (yeah, I know it doesn't take much!). I use a long plastic zip as the metal ones can be a bit scratchy and here is the result:
The tighter the stich the more wavy your flower will be. I stiched the button in the middle for a bit of bling!
Christmas lantern
Here is a lantern I did as part of a Christmas crop for l'atelier à scrap.
It's actually quite easy to make and looks cool when the candle's lit up.
It's actually quite easy to make and looks cool when the candle's lit up.
You can view the tutorial here
Sunday, 11 December 2011
Blog Candy
Great news from ScrapFriends. They've started a blog where they'll publish latest news, stock arrivals and all other information related to scrapbooking.
They are also going to run challenges and competitions.
To celebrate their opening they have a sweet candy for grab.
Not one, not two ... but three candies.
Visit their site, become a friend and get a chance to win all these fab goodies!
Saturday, 10 December 2011
Christmas card
I forgot I bought these Christmas papers last year and during my hunting for embellishments I came across these and decided to put them to good use. I hope you like it.
I cut the trees free hand and embossed them with a Christmas sizzix
folder. I distressed them with Rangers "peeled paint" distress ink and
covered them in glitter glue.
I cut out some smowflakes with Marianne Creatables dies and glittered one of them whilst putting Mod Podge on the other.
I then glued lots of small flower metal findings to imitate small snowflakes. That's it!
 |
 | ||
| The deer and writing was a free stamp |
 | |||||||
|
Friday, 9 December 2011
My Christmas wreath
In my previous post I was admiring some very beautiful homemade wreaths and I finally decided to have a go and made this one:
My sister found the tutorial here:http://hobbydoos-anneke.blogspot.com/2011/11/turtorial-krans-met-pedaalemmerzakken.html if you feel inspired. It's in Dutch but every step is in picture too so it's easy to understand.
I used white pedal bin liners. You have to cut the sealed end off and then just tie the bag around the ring. Secure it with a tight knot and keep going until the whole ring is covered. Once all the bags are in place, start opening them one by one and "fluffing" them up as you do. And you're done. Then just add the decorations you fancy to make it more colourful or just keep it plain for a simple clean look.
It took about two hours just to wrap all the plastic bags on the polysterene ring (didn't have a twig one!). Well worth having a go!
Tuesday, 6 December 2011
Wreath inspiration
I have been looking for a bit of inspiration for a modern wreath. I saw several on the net whilst blog hopping but I never seem to remember where from (after a few hours of hopping!!). So when I found this link I thought I would share it now before I forgot - again! It's got lots of fabulous ideas all I have to do now is get crafting!!

http://freshome.com/2009/12/13/34-great-christmas-wreath-decorating-ideas/
http://freshome.com/2009/12/13/34-great-christmas-wreath-decorating-ideas/
Subscribe to:
Comments (Atom)


